
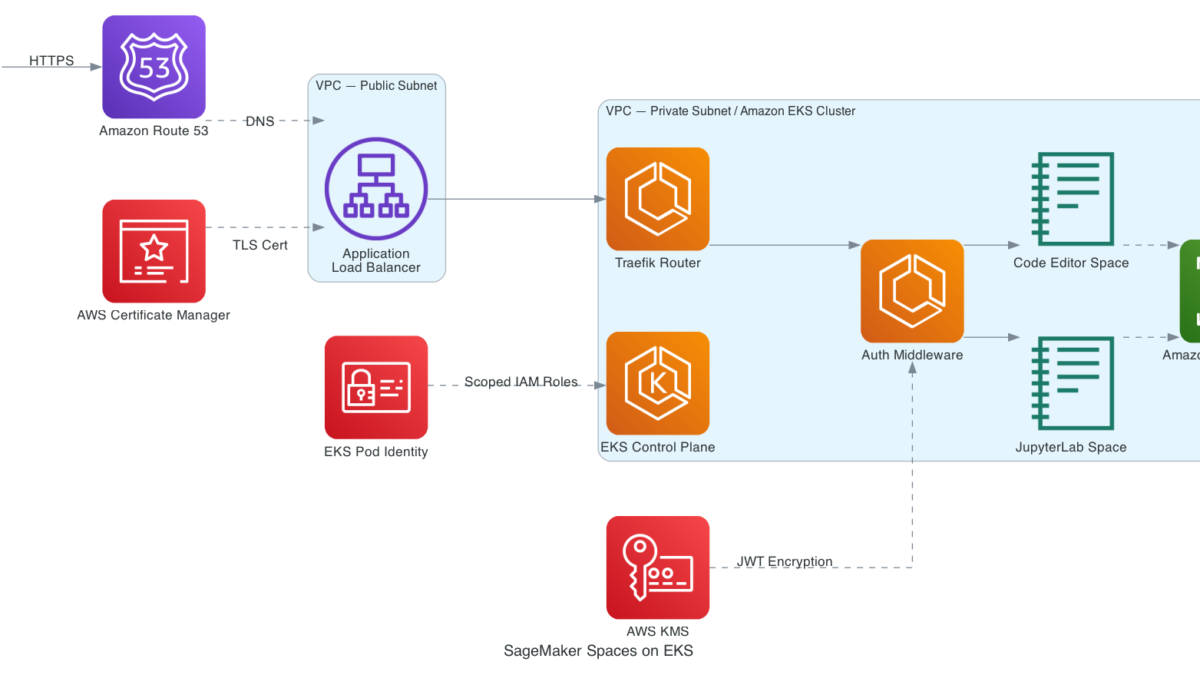
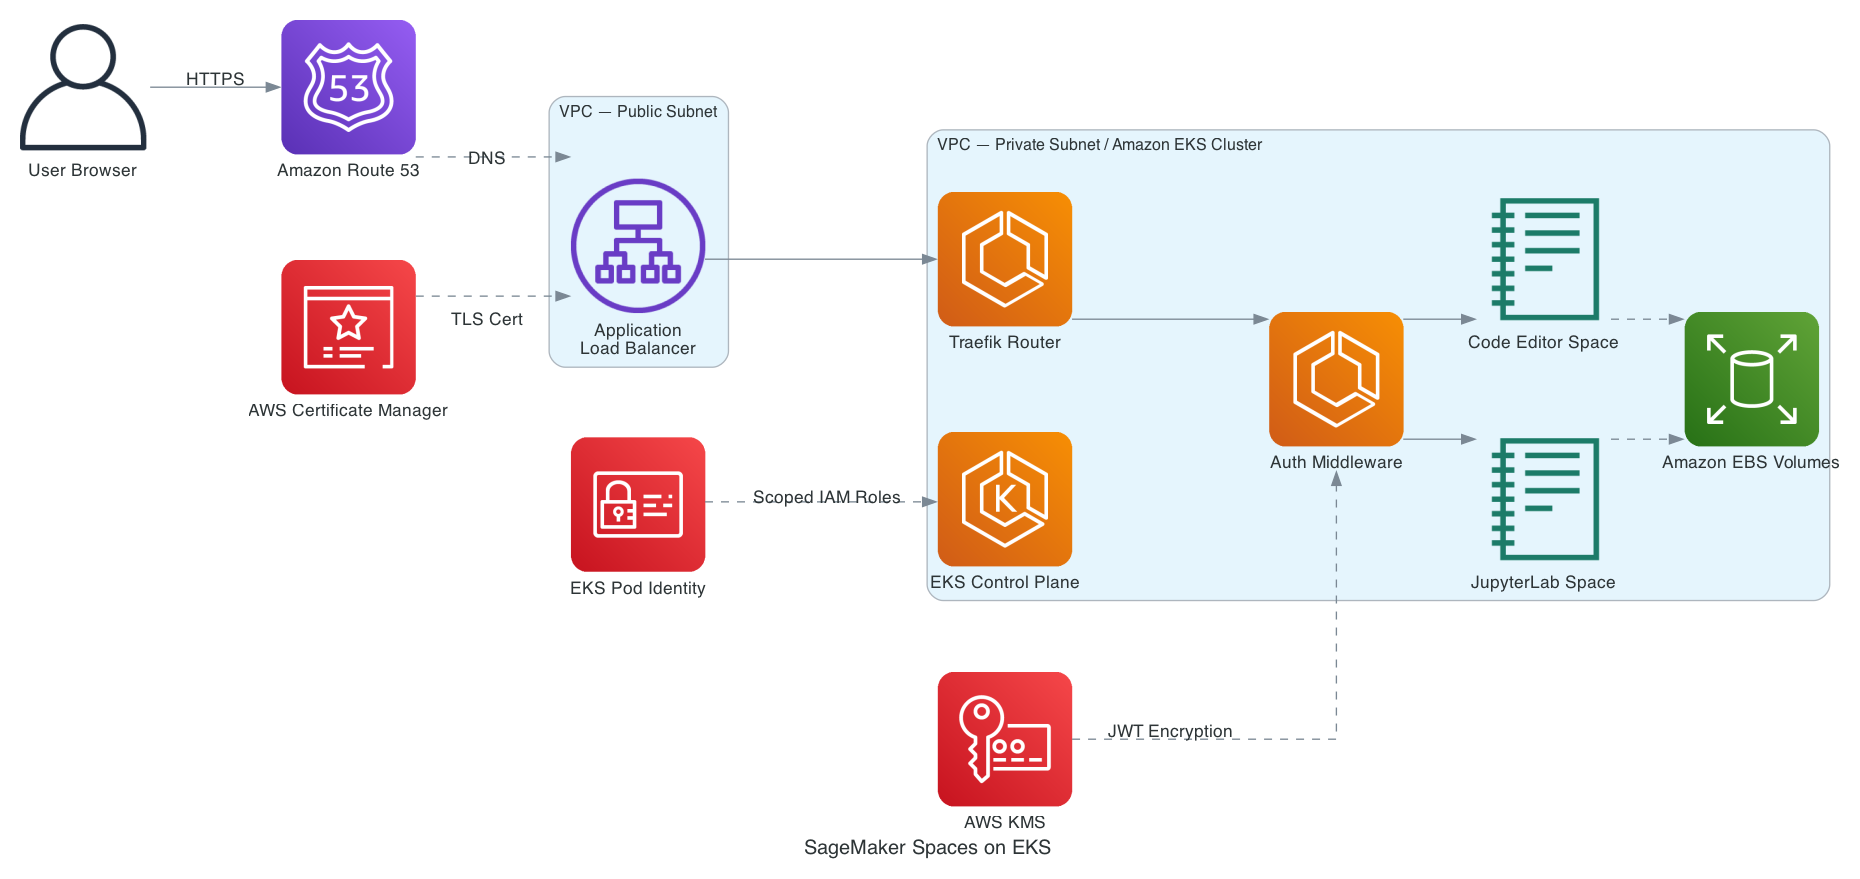
Data scientists building AI workflows on Amazon Elastic Kubernetes Service (Amazon EKS) face a recurring infrastructure gap: the interactive development environments they need — JupyterLab and Code Editor — usually live outside the cluster that runs their training pipelines. That separation means giving up the GPU nodes, shared storage, and AWS Identity and Access Management (IAM) roles the pipelines already depend on. The Amazon SageMaker AI Spaces add-on for Amazon EKS closes that gap by running managed IDEs on the cluster you already operate, without standing up a separate JupyterHub deployment.
This guide walks through installing the SageMaker AI Spaces add-on on an existing Amazon EKS cluster. You will configure supporting add-ons, set up IAM roles through EKS Pod Identity, provision an AWS Load Balancer Controller, request a TLS certificate, create an AWS Key Management System (AWS KMS) encryption key, and launch your first Space. You will also reach that Space through a presigned URL in the browser and from VS Code over SSH-over-SSM.
Prerequisites
Before you begin, confirm you have the following in place:
- An AWS account with the AWS Command Line Interface (AWS CLI) 2.x or later configured for your target AWS Region.
kubectl1.30 or later and Helm v3 installed.- A Route 53 public hosted zone for a domain you own, referenced as
<YOUR_DOMAIN>throughout this guide. - IAM permissions to create roles, policies, EKS add-ons, access entries, Pod Identity associations, ACM certificates, and KMS keys.
- The SageMaker AI Spaces add-on version 0.1.4 or later installed or available to install, because earlier versions supported only Amazon SageMaker HyperPod.
Set these variables once; the remaining steps reuse them:
export CLUSTER_NAME=<CLUSTER_NAME>
export REGION=<REGION>
export ACCOUNT_ID=$(aws sts get-caller-identity --query Account --output text)
Because every role in this guide is consumed by a Kubernetes service account via EKS Pod Identity, they all use the same trust relationship. Create this file once and reference it throughout:
cat > pod-identity-trust.json <<'EOF'
{
  "Version": "2012-10-17",
  "Statement": [{
    "Effect": "Allow",
    "Principal": { "Service": "pods.eks.amazonaws.com" },
    "Action": ["sts:AssumeRole", "sts:TagSession"]
  }]
}
EOF
Cost note: This walkthrough creates resources that incur AWS charges: an internet-facing ALB, EBS volumes, and an EKS cluster. The SSM advanced-instances tier adds approximately $0.00695 per hour per Space pod, as documented in the official AWS guide. Follow the cleanup section when you finish testing.
Step 1: Prepare your EKS cluster
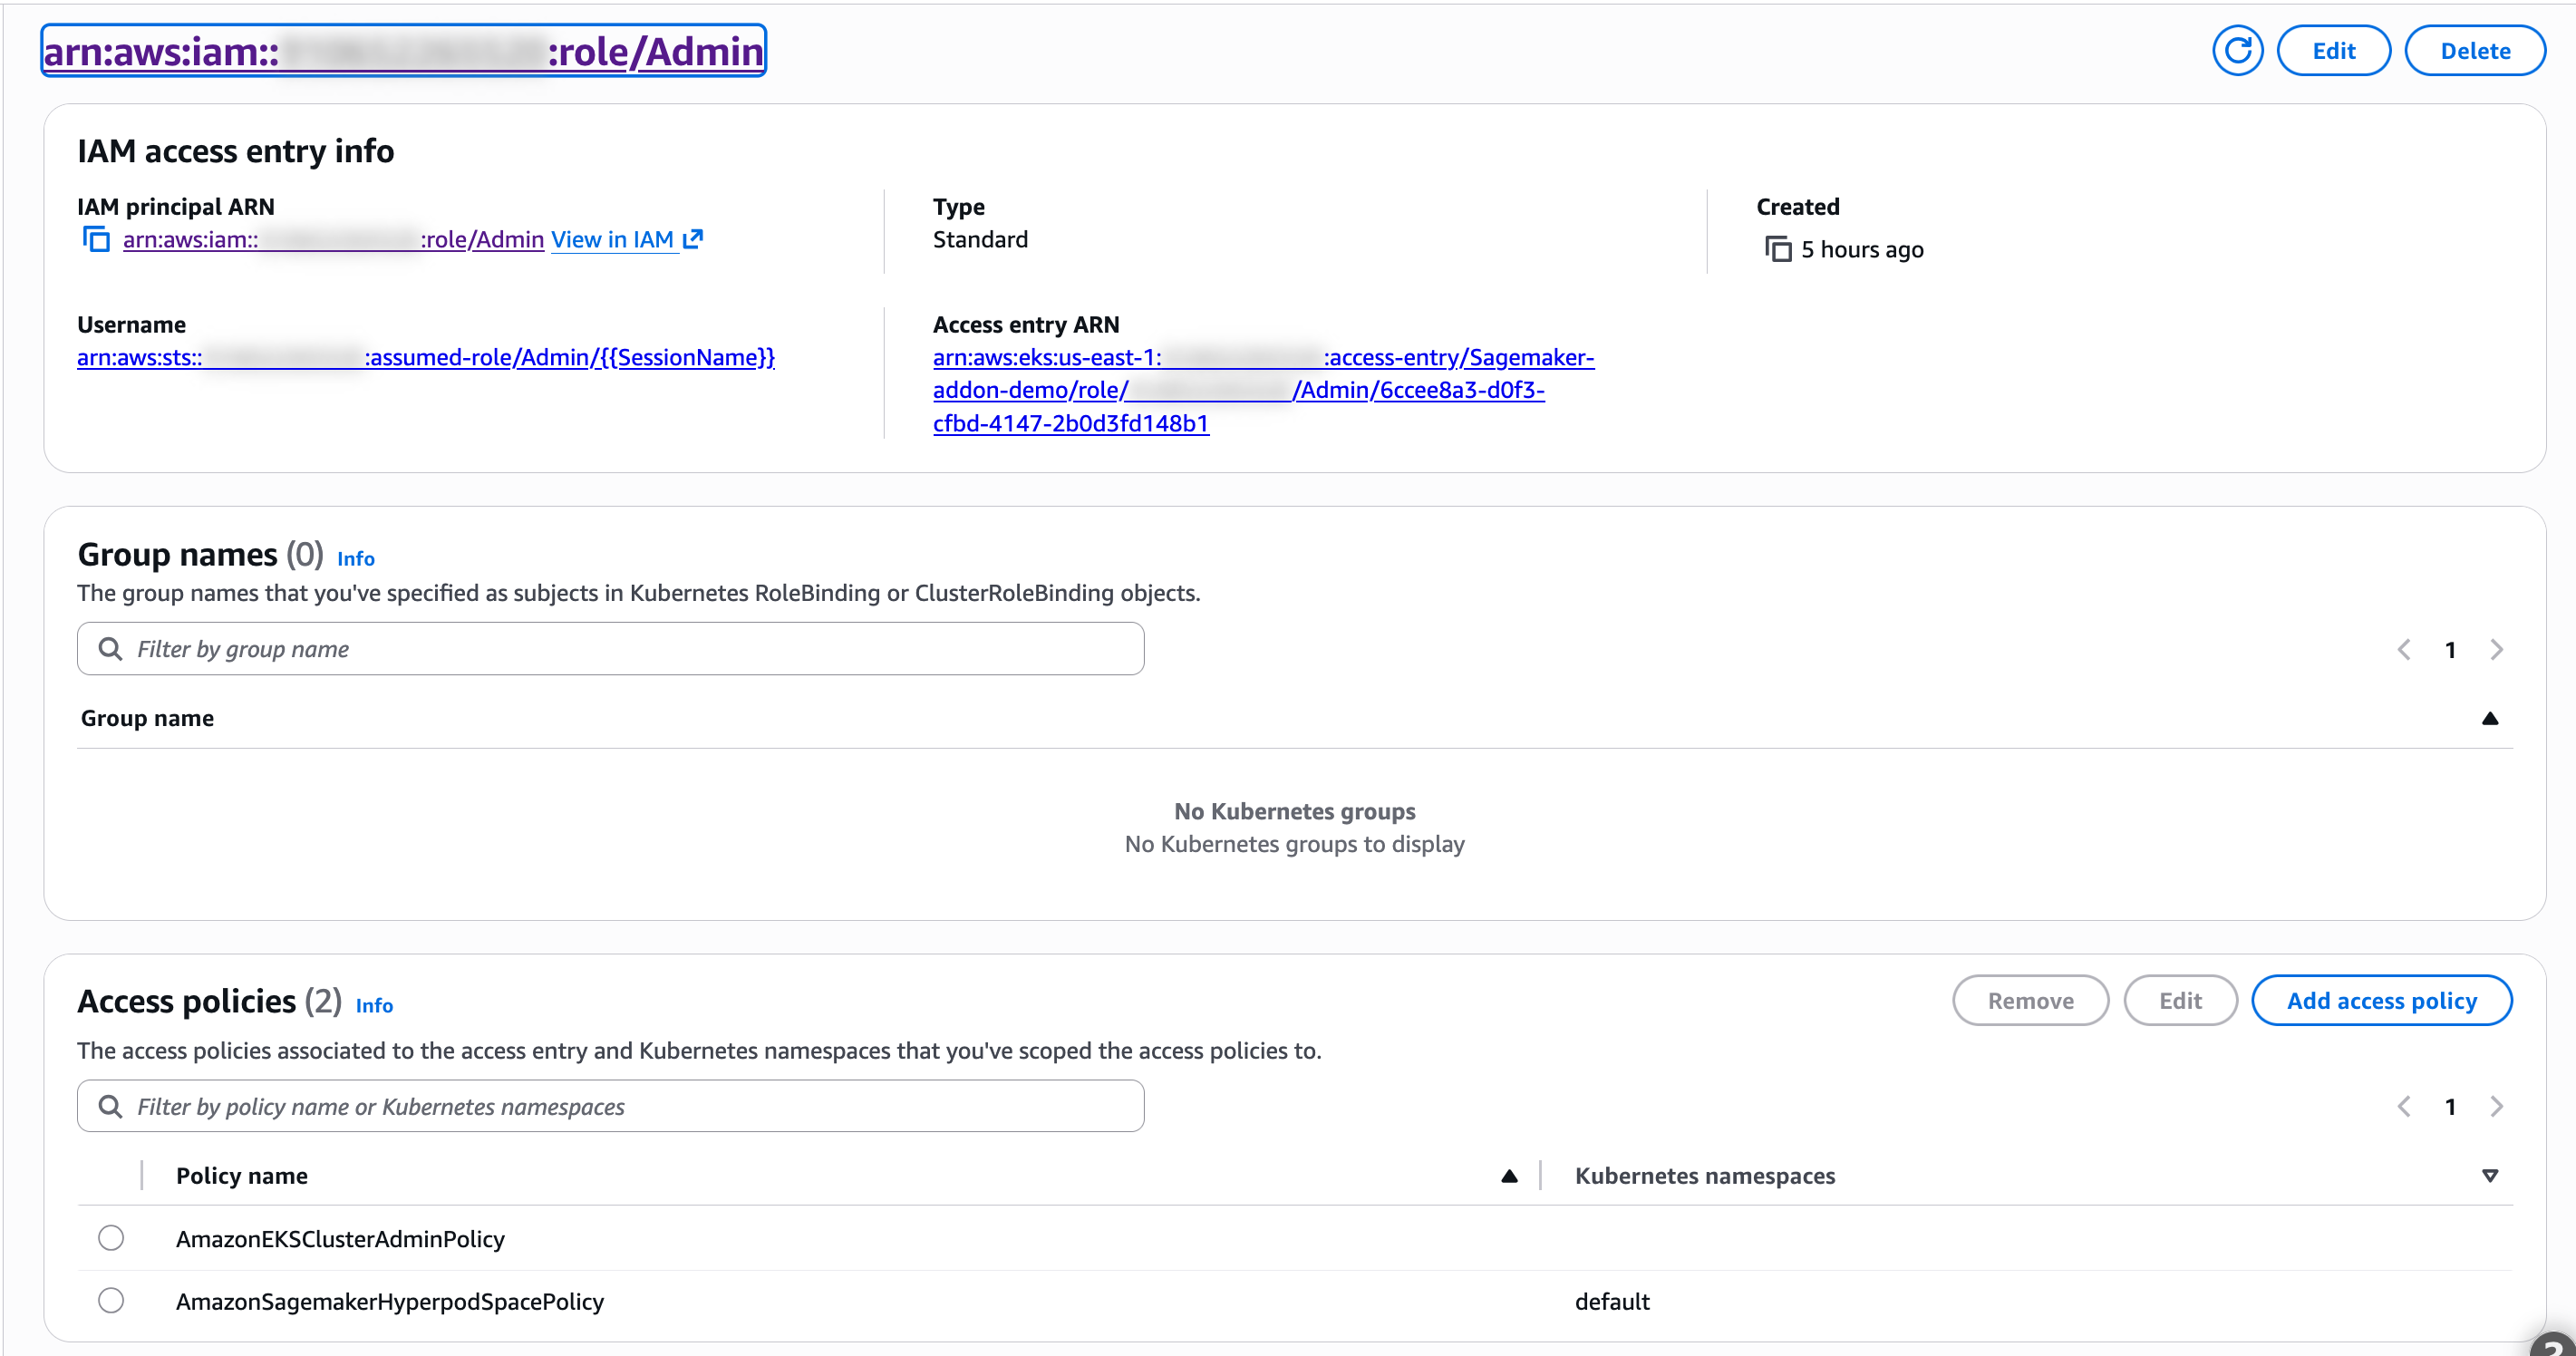
If you are starting from scratch, build the cluster with four Spaces-specific constraints. Disable EKS Auto Mode, because the add-on requires classic EC2-backed worker nodes running Kubernetes 1.30 or later. Provision a VPC with public and private subnets across at least two Availability Zones, a NAT gateway for the private tier, and cluster endpoint access set to both Public and private. During setup, enable the EKS Pod Identity Agent, Amazon EBS CSI Driver, Cert Manager, and External DNS add-ons, but skip Amazon SageMaker Spaces and the AWS Load Balancer Controller for now. Finally, spin up a managed node group in the private subnets using Amazon Linux 2023, m5.xlarge instances or bigger, and 2 nodes.
One step is often overlooked: tag every subnet in the VPC so the AWS Load Balancer Controller can discover them. Do this before you install the Spaces add-on. Otherwise, the controller can place the ALB on private subnets, making Spaces unreachable.
export VPC_ID=$(aws eks describe-cluster \
  --name $CLUSTER_NAME --region $REGION \
  --query 'cluster.resourcesVpcConfig.vpcId' --output text)

ALL_SUBNETS=$(aws ec2 describe-subnets --region $REGION \
  --filters "Name=vpc-id,Values=${VPC_ID}" \
  --query 'Subnets[*].SubnetId' --output text)

aws ec2 create-tags --region $REGION --resources ${ALL_SUBNETS} \
  --tags Key=kubernetes.io/cluster/$CLUSTER_NAME,Value=shared

PUBLIC_SUBNETS=$(aws ec2 describe-subnets --region $REGION \
  --filters "Name=vpc-id,Values=${VPC_ID}" "Name=map-public-ip-on-launch,Values=true" \
  --query 'Subnets[*].SubnetId' --output text)

aws ec2 create-tags --region $REGION --resources ${PUBLIC_SUBNETS} \
  --tags Key=kubernetes.io/role/elb,Value=1

PRIVATE_SUBNETS=$(aws ec2 describe-subnets --region $REGION \
  --filters "Name=vpc-id,Values=${VPC_ID}" "Name=map-public-ip-on-launch,Values=false" \
  --query 'Subnets[*].SubnetId' --output text)

aws ec2 create-tags --region $REGION --resources ${PRIVATE_SUBNETS} \
  --tags Key=kubernetes.io/role/internal-elb,Value=1
Route 53 hosted zone configured for the Spaces domain — screenshot from the official AWS Machine Learning blog post Run interactive IDEs on Amazon EKS with SageMaker AI.
Step 2: Configure kubectl and verify cluster health
Point kubectl at your cluster and confirm the add-on pods are healthy:
aws eks update-kubeconfig --name $CLUSTER_NAME --region $REGION
kubectl get nodes
Both workers should report Ready. Next, confirm the system pods are healthy across the add-on namespaces:
kubectl get pods -A
Every pod in kube-system, cert-manager, and external-dns should be Running before you continue.
Step 3: Grant External DNS Route 53 permissions
External DNS needs Route 53 permissions to manage DNS records. Create the role, attach a least-privilege policy, and bind it through Pod Identity:
aws iam create-role --role-name ExternalDNSRole \
  --assume-role-policy-document file://pod-identity-trust.json

aws iam put-role-policy --role-name ExternalDNSRole \
  --policy-name ExternalDNSRoute53Policy \
  --policy-document '{
    "Version":"2012-10-17",
    "Statement":[
      {"Effect":"Allow","Action":["route53:ChangeResourceRecordSets"],"Resource":"arn:aws:route53:::hostedzone/*"},
      {"Effect":"Allow","Action":["route53:ListHostedZones","route53:ListResourceRecordSets","route53:ListTagsForResource"],"Resource":"*"}
    ]
  }'

aws eks create-pod-identity-association \
  --cluster-name $CLUSTER_NAME --region $REGION \
  --namespace external-dns --service-account external-dns \
  --role-arn arn:aws:iam::${ACCOUNT_ID}:role/ExternalDNSRole

kubectl rollout restart deployment -n external-dns external-dns
Security note: Scope each Pod Identity role to minimum actions and resources. Prefer explicit resource ARNs over wildcards, and confirm only the intended service account can assume the role.
Step 4: Install the AWS Load Balancer Controller
Your Spaces environments need an internet-facing entry point, which means provisioning an Application Load Balancer. The AWS Load Balancer Controller handles that automatically. Set up its IAM policy, role, and Pod Identity binding first:
curl -sS -o /tmp/lbc-iam-policy.json \
  https://raw.githubusercontent.com/kubernetes-sigs/aws-load-balancer-controller/main/docs/install/iam_policy.json

aws iam create-policy --policy-name AWSLoadBalancerControllerIAMPolicy \
  --policy-document file:///tmp/lbc-iam-policy.json

aws iam create-role --role-name AWSLoadBalancerControllerRole \
  --assume-role-policy-document file://pod-identity-trust.json

aws iam attach-role-policy --role-name AWSLoadBalancerControllerRole \
  --policy-arn arn:aws:iam::${ACCOUNT_ID}:policy/AWSLoadBalancerControllerIAMPolicy

aws eks create-pod-identity-association \
  --cluster-name $CLUSTER_NAME --region $REGION \
  --namespace kube-system --service-account aws-load-balancer-controller \
  --role-arn arn:aws:iam::${ACCOUNT_ID}:role/AWSLoadBalancerControllerRole
Install the Helm chart. Pass vpcId and region explicitly. On chart v3.2+, the controller fails if it auto-detects the VPC through EC2 metadata, which EKS blocks for pods:
helm repo add eks https://aws.github.io/eks-charts
helm repo update eks
helm install aws-load-balancer-controller eks/aws-load-balancer-controller \
  -n kube-system \
  --set clusterName=$CLUSTER_NAME \
  --set serviceAccount.create=true \
  --set serviceAccount.name=aws-load-balancer-controller \
  --set region=$REGION \
  --set vpcId=$VPC_ID

kubectl rollout status deployment -n kube-system aws-load-balancer-controller --timeout=180s
Both controller replicas should come up:
kubectl get pods -n kube-system -l app.kubernetes.io/name=aws-load-balancer-controller
The AWS Load Balancer Controller provisions an Application Load Balancer when you create a Kubernetes Ingress or Gateway resource, and a Network Load Balancer when you create a Service of type LoadBalancer. With version 2.14.0 or later, the controller also supports the Kubernetes Gateway standard, which consolidates configuration that previously required custom Ingress annotations.

Architecture overview of the AWS Load Balancer Controller routing traffic to EKS pods — from the official Amazon EKS documentation on Route internet traffic with AWS Load Balancer Controller.
Step 5: Create TLS certificate, KMS key, and SSM configuration
Three infrastructure pieces must exist before the Spaces add-on can launch a managed IDE. First, a publicly trusted TLS certificate so browsers trust the Space URL. Second, a KMS key that the auth middleware uses to encrypt and decrypt JSON Web Tokens (JWTs). Third, an SSM service setting that enables Session Manager tunnels for VS Code remote access.
Request the ACM certificate
Request an ACM certificate covering your domain and a wildcard, using DNS validation:
CERT_ARN=$(aws acm request-certificate \
  --domain-name "<YOUR_DOMAIN>" \
  --subject-alternative-names "*.<YOUR_DOMAIN>" \
  --validation-method DNS \
  --region $REGION \
  --query CertificateArn --output text)

# Read the CNAME records ACM expects, then add them to your Route 53 hosted zone.
aws acm describe-certificate --certificate-arn "$CERT_ARN" \
  --region $REGION \
  --query 'Certificate.DomainValidationOptions[].ResourceRecord'
Wait for the certificate status to reach Issued, then copy the ARN.
ACM certificate issued for the Spaces domain — screenshot from the official AWS Machine Learning blog post Run interactive IDEs on Amazon EKS with SageMaker AI.
Security note: DNS validation verifies domain ownership and triggers ACM automatic renewal. Keep the validation CNAMEs in Route 53. Removing them breaks renewal.
Create the KMS encryption key
Create a symmetric encryption key for JWT encryption. The auth middleware calls kms:GenerateDataKey per JWT, so the key must be symmetric ENCRYPT_DECRYPT:
KMS_KEY_ARN=$(aws kms create-key --region $REGION \
  --description "SageMaker Spaces JWT encryption" \
  --query 'KeyMetadata.Arn' --output text)

aws kms create-alias --region $REGION \
  --alias-name alias/sagemaker-spaces-jwt \
  --target-key-id "$KMS_KEY_ARN"
Enable the SSM advanced-instances tier
Session Manager tunnels to hybrid managed instances — which is what VS Code remote uses — require this tier. It costs approximately $0.00695 per hour per Space pod, per the official AWS guide:
aws ssm update-service-setting --region $REGION \
  --setting-id arn:aws:ssm:$REGION:${ACCOUNT_ID}:servicesetting/ssm/managed-instance/activation-tier \
  --setting-value advanced
Step 6: Install the SageMaker AI Spaces add-on
You create IAM roles for the Spaces controller and auth middleware, then install the add-on.
Create the SSM managed-instance role
Each Space pod uses this role in the SSM fleet:
aws iam create-role --role-name SageMakerSpacesSSMManagedNodeRole \
  --assume-role-policy-document '{
    "Version":"2012-10-17",
    "Statement":[{
      "Effect":"Allow",
      "Principal":{"Service":"ssm.amazonaws.com"},
      "Action":"sts:AssumeRole"
    }]
  }'

aws iam attach-role-policy --role-name SageMakerSpacesSSMManagedNodeRole \
  --policy-arn arn:aws:iam::aws:policy/AmazonSSMManagedInstanceCore
Create the Spaces controller role
The controller needs SSM, PassRole, and KMS permissions. Save the following policy as spaces-controller-policy.json, replacing <REGION>, <ACCOUNT_ID>, and <KMS_KEY_ARN> with your own values:
{
  "Version": "2012-10-17",
  "Statement": [
    {
      "Sid": "SSMAccountLevel",
      "Effect": "Allow",
      "Action": [
        "ssm:CreateActivation", "ssm:DeleteActivation", "ssm:DescribeActivations",
        "ssm:DescribeInstanceInformation", "ssm:DeregisterManagedInstance",
        "ssm:ListTagsForResource", "ssm:AddTagsToResource", "ssm:ListDocuments",
        "ssm:DescribeSessions"
      ],
      "Resource": "*"
    },
    {
      "Sid": "SSMDocumentMgmt",
      "Effect": "Allow",
      "Action": [
        "ssm:CreateDocument", "ssm:DescribeDocument", "ssm:GetDocument",
        "ssm:UpdateDocument", "ssm:UpdateDocumentDefaultVersion", "ssm:DeleteDocument"
      ],
      "Resource": "arn:aws:ssm:<REGION>:<ACCOUNT_ID>:document/SageMaker-Space*"
    },
    {
      "Sid": "SSMSessionMgmt",
      "Effect": "Allow",
      "Action": [
        "ssm:StartSession", "ssm:TerminateSession", "ssm:ResumeSession", "ssm:GetConnectionStatus"
      ],
      "Resource": [
        "arn:aws:ssm:<REGION>:<ACCOUNT_ID>:document/SageMaker-Space*",
        "arn:aws:ssm:<REGION>:<ACCOUNT_ID>:managed-instance/*",
        "arn:aws:ssm:<REGION>::document/AWS-StartSSHSession"
      ]
    },
    {
      "Sid": "PassSSMManagedNodeRole",
      "Effect": "Allow",
      "Action": "iam:PassRole",
      "Resource": "arn:aws:iam::<ACCOUNT_ID>:role/SageMakerSpacesSSMManagedNodeRole",
      "Condition": { "StringEquals": { "iam:PassedToService": "ssm.amazonaws.com" } }
    },
    {
      "Sid": "KMSForJWT",
      "Effect": "Allow",
      "Action": ["kms:GenerateDataKey", "kms:Decrypt", "kms:Encrypt", "kms:DescribeKey"],
      "Resource": "<KMS_KEY_ARN>"
    }
  ]
}
Create the role and attach the policy:
aws iam create-role --role-name SageMakerSpacesControllerRole \
  --assume-role-policy-document file://pod-identity-trust.json

aws iam put-role-policy --role-name SageMakerSpacesControllerPolicy \
  --policy-name SageMakerSpacesControllerPolicy \
  --policy-document file://spaces-controller-policy.json
Bind the controller role to the service account:
aws eks create-pod-identity-association \
  --cluster-name $CLUSTER_NAME --region $REGION \
  --namespace kube-system --service-account sagemaker-spaces-controller \
  --role-arn arn:aws:iam::${ACCOUNT_ID}:role/SageMakerSpacesControllerRole
Install the Spaces add-on
helm repo add aws-sagemaker-spaces https://aws.github.io/sagemaker-spaces-helm-charts
helm repo update aws-sagemaker-spaces

helm install sagemaker-spaces aws-sagemaker-spaces/sagemaker-spaces \
  --namespace kube-system \
  --set clusterName=$CLUSTER_NAME \
  --set region=$REGION \
  --set kmsKeyArn=$KMS_KEY_ARN
Verify the controller pods are running:
kubectl get pods -n kube-system -l app.kubernetes.io/name=sagemaker-spaces
Step 7: Create your first Space
A Space is a managed JupyterLab or Code Editor environment running on your cluster. Create one with the Spaces CLI or through the Kubernetes API:
kubectl apply -f - <<EOF
apiVersion: spaces.sagemaker.aws/v1
kind: Space
metadata:
  name: my-jupyter-space
  namespace: default
spec:
  type: JupyterLab
  domain: <YOUR_DOMAIN>
  certificateArn: $CERT_ARN
  storage:
    ebs:
      size: 100Gi
  compute:
    nodeGroup: private
    instanceType: ml.g5.xlarge
EOF
The Spaces controller provisions the Space, attaches the EBS volume, and configures the presigned URL. Monitor the progress:
kubectl get spaces my-jupyter-space -n default -w
When the SpacePhase reaches Ready, retrieve the presigned URL:
kubectl get space my-jupyter-space -n default -o jsonpath='{.status.url}'
Open that URL in your browser. You have a fully configured JupyterLab environment with GPU access, shared storage, and IAM roles identical to your training pipelines.
Step 8: Connect VS Code over SSH-over-SSM
VS Code can connect to the Space pod through AWS Systems Manager Session Manager. Install the AWS Toolkit for VS Code, then open the Command Palette and select AWS: Connect to Remote SSH Host. Enter the Space hostname, and the toolkit establishes the tunnel automatically.
The same SSM advanced-instances tier you enabled earlier handles the Session Manager connection. Each Space pod registers as a managed instance in the SSM fleet, and the toolkit authenticates through the SageMakerSpacesSSMManagedNodeRole you created.
Step 9: Configure OIDC sign-in with Amazon Cognito (optional)
For team environments, replace presigned URLs with OpenID Connect (OIDC) sign-in. Amazon Cognito acts as the identity provider, and the Spaces auth middleware validates tokens using the KMS key.
- Create a Cognito user pool and app client.
- Configure the Spaces Space to use the Cognito issuer URL.
- Update the auth middleware deployment to reference the Cognito OIDC configuration.
- Test sign-in through your domain.
This removes the need to generate and distribute presigned URLs, and it gives your team single sign-on with MFA, password policies, and audit logging through CloudTrail.
Step 10: Consolidate workloads and validate GPU utilization
With interactive and training workloads on one cluster, GPU nodes stay busy between jobs. According to the EKS Pod Identity documentation, each EKS Pod Identity association maps a role to a service account in a namespace, and identical associations can be repeated across multiple clusters without modifying the trust policy. That portability matters when you promote Spaces from a test cluster to production.
The architectural payoff is measurable. Consolidating interactive and training workloads on one cluster can lift GPU utilization by up to 30 percent compared with a dedicated notebook fleet, according to the official AWS blog post. It also avoids the cost of an always-on GPU environment, which the same source notes can run into thousands of dollars per month, by letting Space pods scale down when idle while the underlying cluster persists.
Cleanup
When you finish testing, delete the Space and the add-on to stop incurring charges:
helm uninstall sagemaker-spaces -n kube-system
kubectl delete space my-jupyter-space -n default
Delete the IAM roles, policies, and Pod Identity associations if you no longer need them. Remove the ALB through your Kubernetes Ingress or Service resources, and confirm the SSM managed instances deregister.
Related guides
If you are building AI agents rather than interactive notebooks, see our guide on how to run production AI agents in n8n with Amazon Bedrock AgentCore for a complementary workflow. For deeper AWS AI coverage, see agent skills for automated reasoning policies in Amazon Bedrock and our 7 real AI agents in production report.