
The Model Context Protocol (MCP) solves a real gap: it standardizes how AI models discover and call external tools. But the standard assumes the MCP client and server live in the same execution environment. When you move the agent to the cloud, that assumption breaks. Your finance team still keeps spreadsheets on laptops. Your browser still holds context from local research. The data never left the machine, and the cloud agent cannot reach it.
AWS published a walkthrough for building a production-grade MCP bridge that connects an Amazon Bedrock AgentCore-hosted agent to local MCP servers. The bridge tunnels MCP messages over WebSocket and browser native messaging, letting a remote agent invoke tools on a user’s machine without exposing raw credentials to the browser. The post details a four-component architecture, a sample Excel MCP server, and the security trade-offs of the design. How we built an MCP bridge to give our AgentCore-hosted AI agent access to local MCP tools | Artificial Intelligence
This guide explains the architecture, walks through the deployment steps, and highlights the constraints you should evaluate before putting this pattern into production.
What problem does the MCP bridge solve?
MCP uses a client-server model. The host application, such as Claude Desktop or an agent runtime, acts as the client. It connects to one or more MCP servers that expose tools, resources, and prompts. The protocol supports two transports: stdio for same-machine communication and streamable HTTP for remote server access. Anthropic
The missing case is local-server-plus-remote-client. A cloud-hosted Strands agent running on AgentCore cannot open a local stdio pipe to your laptop. The MCP bridge fills that gap by sitting on the user’s machine, translating between the browser’s native messaging envelope and raw MCP JSON-RPC, then forwarding requests to a locally running server.
This matters most for data-heavy workflows. Financial analysts, compliance teams, and power users keep files in Excel, PDFs, and local databases. They want cloud AI to act on that data without uploading entire drives. The bridge gives the agent a controlled channel to the local environment.
Architecture overview
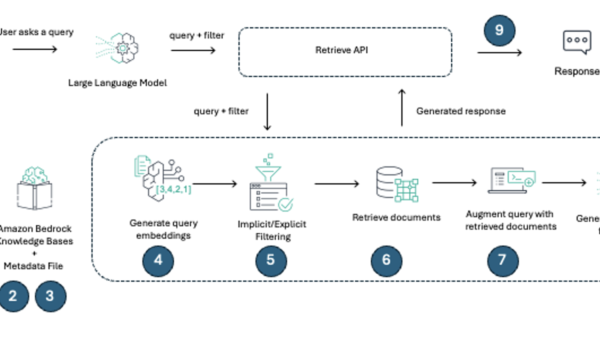
The AWS design uses four components that run in separate processes. The AgentCore runtime hosts the Strands agent in the cloud and acts as the MCP client. A Chrome side-panel extension provides the chat interface and relays MCP messages over WebSocket. A local MCP Bridge, built with FastMCP, receives those messages, strips the native-messaging envelope, and forwards JSON-RPC to a local MCP server via stdio. The MCP server itself can be any compliant server, such as the sample Excel server included in the repository.
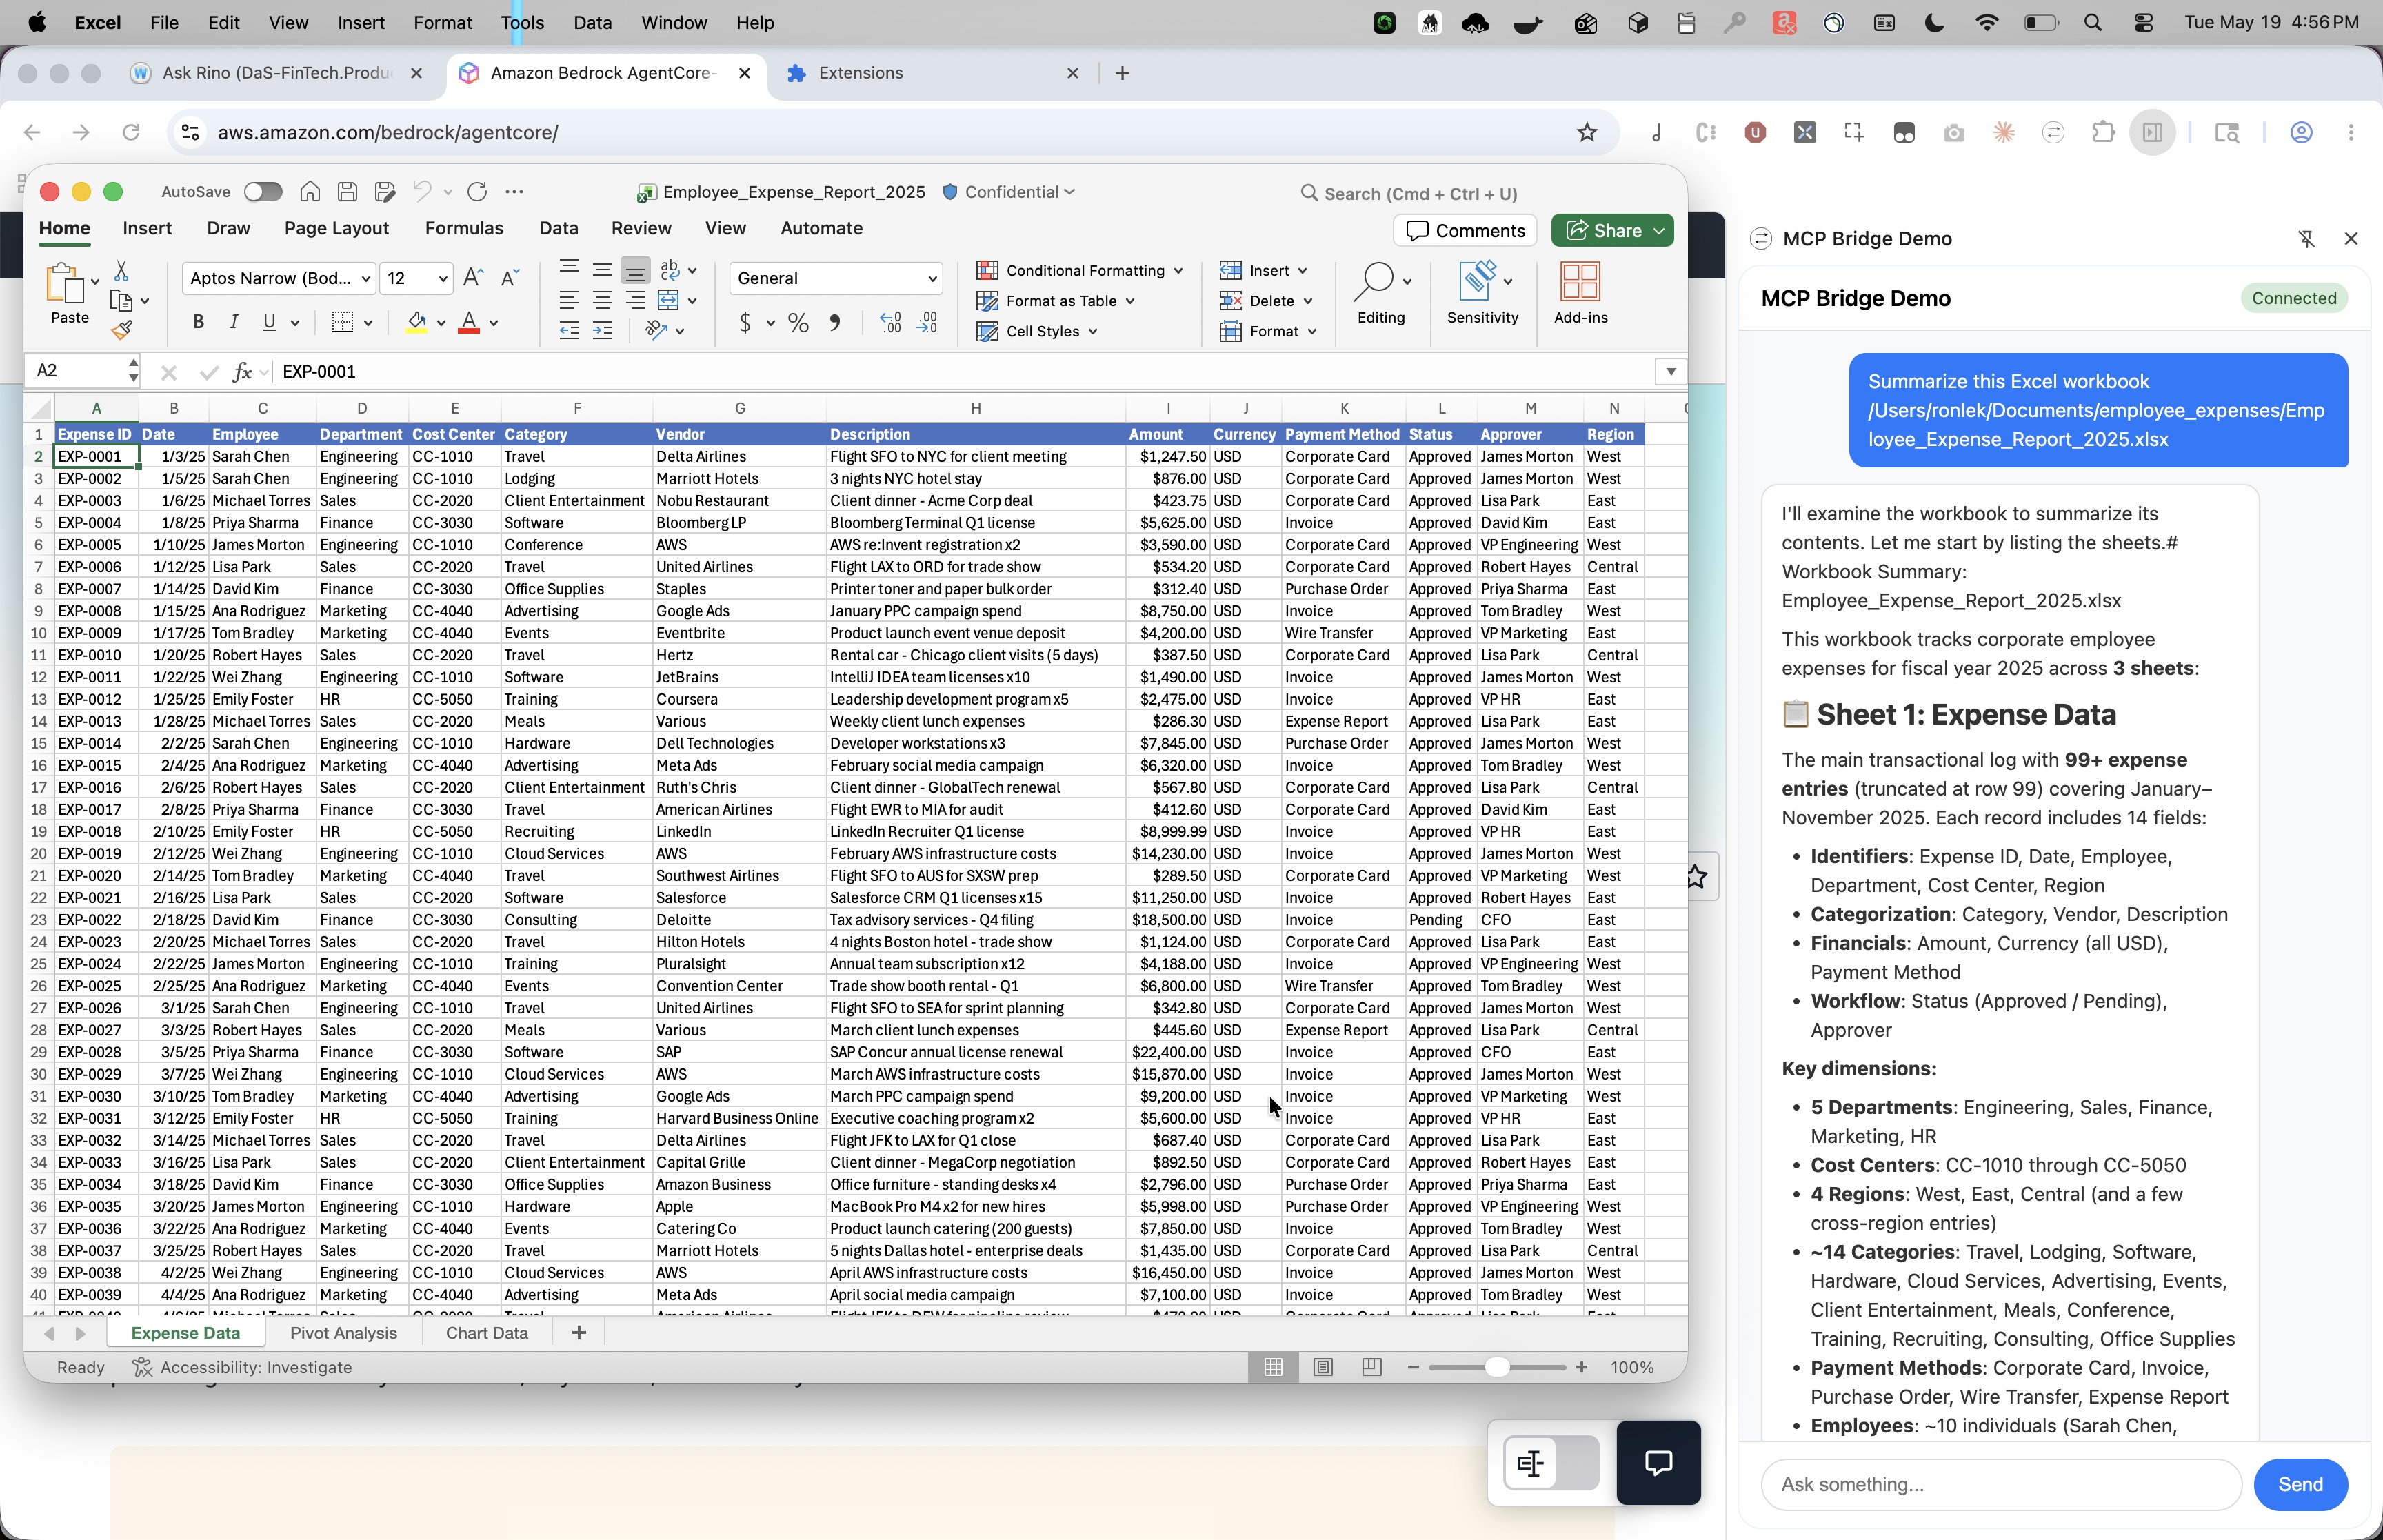
Architecture diagram: MCP bridge components and transport flow. Source: AWS Machine Learning Blog
The end-to-end flow works like this. The user asks a question in the extension side panel. The extension opens a presigned WebSocket to the AgentCore runtime. When the Strands agent decides to call a tool, it sends a tools/call JSON-RPC request back over the same WebSocket. The extension relays that request to the local bridge via Chrome native messaging. The bridge unwraps the envelope, forwards the JSON-RPC to the MCP server over stdio, receives the result, and sends it back through the same chain. GitHub – aws-samples/sample-mcp-bridge-agentcore
Each hop strips one layer of wrapping. The agent never sees the native-messaging format. The MCP server never sees the WebSocket envelope. That separation keeps the protocol implementations decoupled.
Prerequisites
Before you begin, confirm you have the following:
- An AWS account with Bedrock model access enabled. The code sample uses Claude Opus 4.7, so verify model availability in your target Region through the Amazon Bedrock documentation.
- IAM permissions for Bedrock AgentCore (
bedrock-agentcore:*), CloudFormation, IAM role creation, and S3. - AWS CLI configured with credentials. Run
aws sts get-caller-identityto verify. - AWS CDK bootstrapped in your target Region.
- Python 3.10 or later.
- Node.js 20 or later for the AgentCore CLI.
- Google Chrome with Manifest V3 side-panel support.
- Git.
Install the AgentCore CLI and AWS CDK globally:
npm install -g @aws/agentcore
npm install -g aws-cdk
The AWS blog estimates setup at roughly fifteen minutes for deploy, extension install, and bridge registration. How we built an MCP bridge to give our AgentCore-hosted AI agent access to local MCP tools | Artificial Intelligence
Step 1: Clone the repository and install dependencies
Clone the official sample repository and run the setup script. The setup script creates the Python virtual environment, installs dependencies, and prepares the Chrome extension and bridge manifests.
git clone https://github.com/aws-samples/sample-mcp-bridge-agentcore.git
cd mcp-bridge-demo
chmod +x scripts/setup.sh manifests/install.sh
./scripts/setup.sh
Keep the repository path handy. You will reference it again when copying agent code and registering the native messaging host.
Step 2: Deploy the agent to AgentCore
Create a new AgentCore deployment and copy the sample agent code into the generated project structure.
npm install -g @aws/agentcore
cd agent
agentcore create --name McpBridgeAgent --defaults
cd McpBridgeAgent
cp ../agent.py app/McpBridgeAgent/main.py
cp ../mcp_bridge_transport.py app/McpBridgeAgent/
agentcore deploy
After deployment completes, note the runtime Amazon Resource Name (ARN) from the output. You can also retrieve it later with agentcore status. The bridge configuration file needs this ARN to generate presigned WebSocket URLs.
Step 3: Configure the bridge
Edit bridge/bridge_config.json with your runtime ARN, Region, and presigned URL expiry. The default expiry is 300 seconds. AWS Machine Learning Blog
{
  "runtime_arn": "arn:aws:bedrock-agentcore:<region>:<account-id>:runtime/<your-runtime>",
  "region": "us-east-1",
  "presign_expires": 300
}
The bridge uses your local AWS credentials to generate SigV4-signed WebSocket URLs automatically. No manual token management is required, and no credentials leave your machine.
Step 4: Load the Chrome extension
Open Chrome and navigate to chrome://extensions. Enable Developer mode, choose Load unpacked, and select the extension/ directory inside the cloned repository. Chrome displays an extension card with an ID. Copy that ID; the native messaging registration step needs it.
The side panel opens when you click the extension icon after restarting the browser. It automatically requests a presigned URL from the bridge and connects to AgentCore on startup.
Step 5: Register the native messaging bridge
Chrome requires a manifest file in a well-known location to launch local native-messaging hosts. The repository includes an install script that writes the manifest and sets the correct path.
./manifests/install.sh <your-extension-id>
The manifest specifies the bridge script as the native host. Chrome launches the bridge on demand when the extension calls chrome.runtime.connectNative. The bridge stays alive for the lifetime of the connection.
Step 6: Test the connection
Restart Chrome and open the extension side panel. The extension requests a presigned URL through the background script, opens a WebSocket to AgentCore, and discovers available MCP tools automatically.
Try queries that exercise the local Excel MCP server, such as:
- “Create a workbook called budget.xlsx with sheets Q1 and Q2”
- “Write ‘Revenue’ in cell A1 of the Q1 sheet in budget.xlsx”
- “Read the data from budget.xlsx”
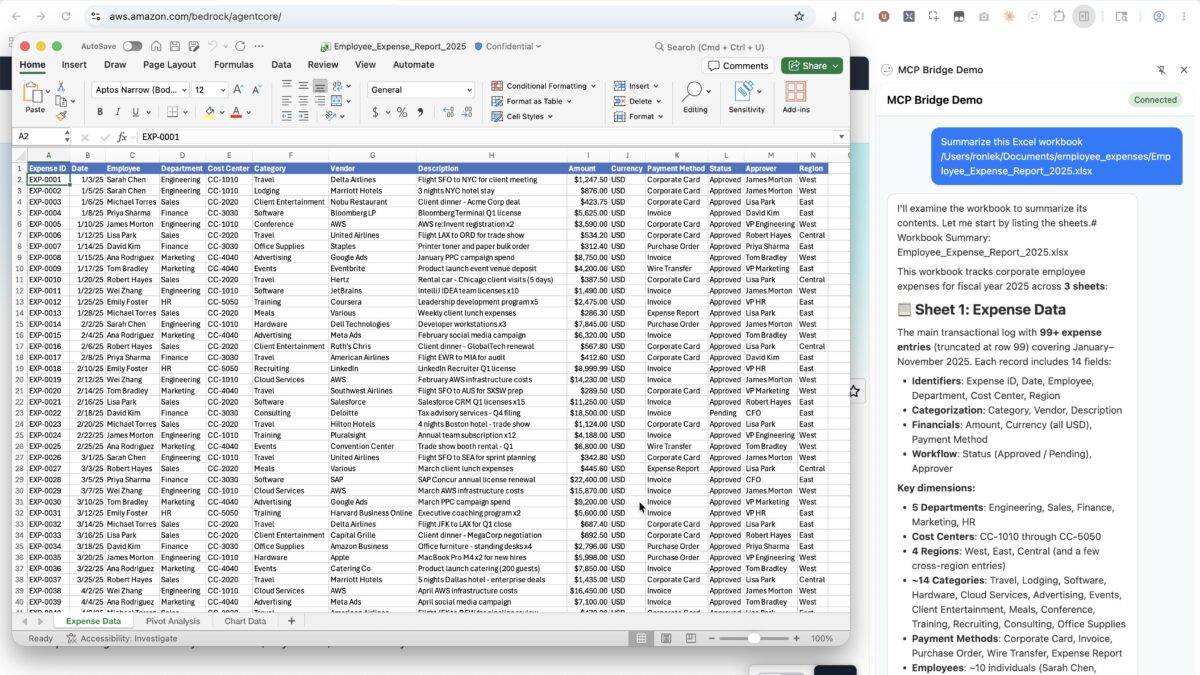
If the agent calls a tool, you will see the request travel through the extension, bridge, and local server, then return as a structured summary in the side panel.
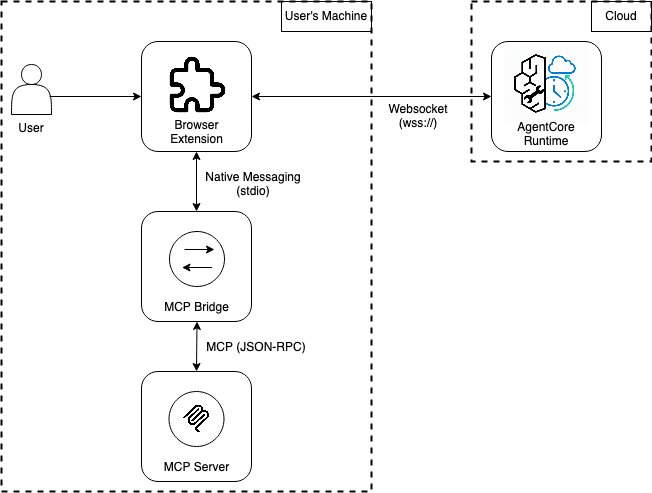
Extension side panel streaming a workbook summary through the MCP bridge. Source: AWS Machine Learning Blog
Security considerations
The AWS post prioritizes demonstrating the bridge over hardening it for production, and it calls out several assumptions you should review.
Native messaging origin restriction: Chrome checks the calling extension’s ID against the allowed_origins list in the native messaging manifest. Connections from unlisted extensions are rejected. Presigned URL expiration: WebSocket URLs are SigV4-signed and expire after five minutes. The extension automatically requests a fresh URL after two seconds if the connection drops. Credentials remain on the user’s machine and are not sent to the browser.
Process isolation: The extension, bridge, and MCP server each run in separate operating system processes with no shared memory. The bridge is the primary exposure surface. It accepts instructions from a cloud-hosted agent and runs them locally with the user’s file system permissions. The agent should not have more access than the user explicitly grants, and the user can always inspect which tools were invoked and with what arguments. How we built an MCP bridge to give our AgentCore-hosted AI agent access to local MCP tools | Artificial Intelligence
For a production deployment, AWS recommends adding Amazon Bedrock Guardrails for content filtering and reviewing the bridge’s input validation carefully. The maximum message size from the native messaging host is 1 MB, and the maximum message sent to the host is 64 MiB. Those limits protect the browser from misbehaving local processes but also constrain the size of tool inputs and outputs.
Cleanup
When you finish experimenting, remove the deployed resources to avoid ongoing charges.
cd agent/McpBridgeAgent
agentcore remove all
Tear down the CloudFormation stack, IAM roles, and runtime resources through the AWS Console or CDK destroy if you used CDK to deploy.
What this means for agent infrastructure
The MCP bridge is a concrete example of the local-tool gap closing in agent architectures. Anthropic’s Claude Cowork and similar products already let cloud agents call local tools through managed plugins, but they depend on vendor-hosted connectors. The AWS sample shows how to replicate that pattern self-hosted, with your own model, custom tool servers, and IAM controls. Anthropic
The trade-off is operational complexity. You now maintain a browser extension, a native messaging host, a local bridge process, and an AgentCore deployment. Auto-updates, credential rotation, and cross-platform packaging become your problem. If your use case is limited to a controlled fleet of known machines, that trade-off is manageable. If you need to support arbitrary end-user hardware, consider whether a managed connector or streamable HTTP transport would be simpler.
The repository is available on GitHub if you want to inspect the bridge code, extend the Excel server, or adapt the transport for other local data sources. GitHub – aws-samples/sample-mcp-bridge-agentcore
For a related pattern that runs AI agents in a different workflow automation platform, see our guide on running production AI agents in n8n with Amazon Bedrock AgentCore. If you are evaluating agent capabilities inside your IDE, Copilot in Visual Studio adds agent preview and built-in skills covers the editor-side implementation.
Editorial note: Citation cleanup: we trimmed duplicate citation links that repeated the same source after multiple paragraphs. Every fact and quote is unchanged; the source remains cited where each claim appears.